


Try this experiment to make a miniature chemical fountain using only soluble ammonia and atmospheric pressure
The ammonia fountain is a classic demonstration in which students observe the very high solubility in water of ammonia and identify that ammonia solution is alkaline. The teacher fills a flask, fitted with a glass jet, with dry ammonia, before injecting water into the flask. This dissolves the ammonia and causes a fountain via the jet.
The demonstration itself takes only a few minutes but needs careful advance preparation. With cooperative classes some of the preparation can be woven into the lesson so that the demonstration becomes the focal point.
Equipment
Apparatus
- Eye protection
- Access to a fume cupboard
- Flask, 500 cm3 or 1 dm3, completely dry (see note 1)
- Rubber stopper, plain, to fit the flask
- Two-holed rubber stopper to fit the flask fitted with a glass jet (see note 2)
- Plastic syringe, 10 cm3 (see note 3)
- Trough or large beaker which can hold more water than the flask
- Stand, clamp and boss along with a heavy weight or bench clamp to avoid apparatus toppling over
- White board or sheet of card to act as a background to improve visibility
- Boiling tube fitted with a one-holed rubber stopper holding a drying tube
- One-holed rubber stopper to fit the drying tube, fitted with a short length of glass delivery tube
- Length of rubber delivery tube
- Bunsen burner
- Heat resistant mat
Apparatus notes
- Use a round-bottom borosilicate flask or a thick-walled Buchner flask for this demonstration (other flasks may implode). Check carefully that the flask has no small cracks. Ensure that the flask is clean and scrupulously dry. The best way to achieve this is to put it in a glassware drying cabinet (or alternative) for an hour or so before it is required. Take it out and stopper it (with a dry stopper!) just before it is filled with ammonia. Even slight dampness will result in failure of the demonstration.
- Take the two-holed stopper that fits the flask and insert the glass tube, which has been drawn out into a jet, through one of the holes. The glass tube must fit tightly into the rubber stopper – take great care. Insert a cork borer slightly larger than the diameter of the tube through the hole. Insert the tube, and reverse the cork borer. A 1 cm3 graduated pipette could be used as the glass jet. The tip of the jet should be positioned so that it is in the center of the flask when the stopper is in place. About 20 cm of tube should protrude out of the flask (see the second diagram below). If this demonstration is to be repeated in future, it is worth making up a set of apparatus to keep for this specific purpose.
- Select a syringe which will fit tightly into the second hole of the two-holed stopper.
Chemicals
- Ammonium chloride (HARMFUL), 5 g
- Calcium hydroxide (IRRITANT), 5 g
- Small lumps of calcium oxide (CORROSIVE) as a drying agent, sufficient for the drying tube
- Acid–alkali indicator (eg universal indicator)
Health, safety and technical notes
- Read our standard health and safety guidance.
- Wear eye protection throughout and work in a fume cupboard.
- Ammonium chloride, NH4 Cl(s), (HARMFUL) – see CLEAPSS Hazcard HC009a.
- Calcium hydroxide, Ca(OH)2 (s), (IRRITANT) – see CLEAPSS Hazcard HC018.
- Calcium oxide, CaO(s), (CORROSIVE) – see CLEAPSS Hazcard HC018. This drying agent should be freshly prepared.
- Ammonia gas, NH3 (g), (TOXIC, DANGEROUS FOR THE ENVIRONMENT) – see CLEAPSS Hazcard HC005.
Procedure
Preparing dry ammonia and filling the flask
Note
It is essential that this step is completed in a fume cupboard. This stage could also form part of the demonstration.
- Set up the boiling tube and drying tube as shown in the diagram.
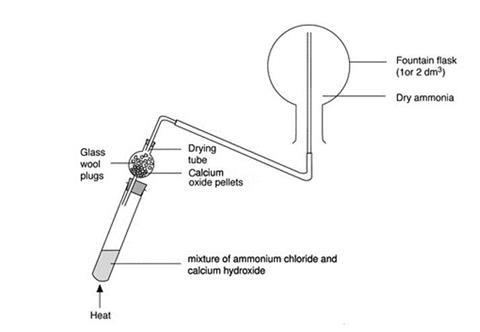
- Ensure that the flask is completely dry and clamp it in an inverted position.
- Arrange a delivery tube for upward delivery of the ammonia into the flask (ammonia is less dense than air).
- Half-fill the drying tube with lumps of calcium oxide and half-fill the boiling tube with a solid mixture of calcium hydroxide and ammonium chloride. Take care – the two solids begin to react immediately on mixing, and ammonia gas is evolved.
- Gently warm the contents of the boiling tube for a few minutes with a small, blue, Bunsen flame.
- Allow ammonia gas to pass through the drying tube into the upturned flask. The water vapour in the ammonia gas is removed by the calcium oxide.
- Check that the flask is full of ammonia by holding barely damp universal indicator (or red litmus) paper near the open neck of the flask and look for an alkaline indication. If in doubt, continue filling the flask for a little longer.
- Stopper the flask with the plain, dry stopper.
Note
It is very important that no water comes into contact with the ammonia until all preparations are complete.
- Fill the trough (or large beaker) with enough water to fill the fountain flask and add enough indicator to give an easily visible colour - this will be much more than is normally used for a titration. If preferred, add a little dilute acid so that the indicator starts in its acid colour.
The demonstration
Note
A fume cupboard is not essential for this step.
- Half-fill the syringe with water, dry the nozzle and carefully fit it into the second hole of the two-holed stopper (see diagram).
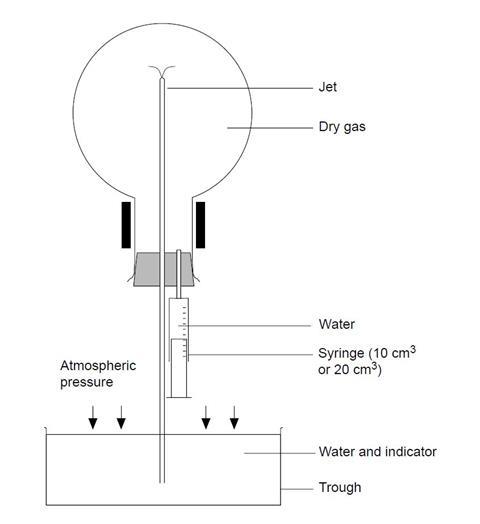
- Remove the plain stopper from the inverted gas-filled flask and quickly fit the stopper which holds the jet and syringe. Be careful not to prematurely inject water from the syringe.
- Clamp (or get an assistant to hold) the flask over the trough or beaker of water so that the protruding glass tube is well below the water level. If clamping, bear in mind that the flask will be heavy when filled with water so take care that it will not overbalance.
- Use the syringe to squirt a few cm3 of water into the flask and gently swirl to dissolve some of the ammonia gas.
- As the gas dissolves, a partial vacuum forms inside the flask and the external air pressure will force water up the tube and through the jet – forming a fountain (see first diagram). The ammonia gas dissolves in the water emerging from the jet and the indicator changes colour.
- The fountain continues for some minutes, depending on the size of the flask and the width of the jet. When the fountain finishes, a bubble of gas remains. This is air and its volume gives an indication of how well the flask was originally filled.
Additional procedure notes
When doing the demonstration, ensure that the flask is securely clamped and that the flask and clamp stand assembly cannot topple over when the flask fills with liquid.
If you acidify the water in the trough, use only a few drops of acid. If you use too much, the fountain will show the alkali colour of the indicator at first and then change to the acid colour when all the ammonia has been neutralised. (Alternatively you might consider letting this happen and making a point of it.)
Teaching notes
This is the equation for the preparation of ammonia:
NH4 Cl(s) + Ca(OH)2 (s) → NH3 (g) + CaCl2 (s) + H2 O(g)
Why is ammonia solution alkaline?
Ammonia dissolves freely in water (1 cm3 of water dissolves at least 800 cm3 of ammonia under normal laboratory conditions). It also reacts reversibly with it:
NH3 (aq) + H2 O(l) ⇌ NH4+ (aq) + OH– (aq)
It is the presence of OH– ions which make the solution alkaline.
Why use calcium oxide for drying ammonia?
Ammonia will react with most other common drying agents such as concentrated sulfuric acid and calcium chloride.
Additional information
This is a resource from the Practical Chemistry project, developed by the Nuffield Foundation and the Royal Society of Chemistry. This collection of over 200 practical activities demonstrates a wide range of chemical concepts and processes. Each activity contains comprehensive information for teachers and technicians, including full technical notes and step-by-step procedures. Practical Chemistry activities accompany Practical Physics and Practical Biology.
The experiment is also part of the Royal Society of Chemistry’s Continuing Professional Development course: Chemistry for non-specialists.
© Nuffield Foundation and the Royal Society of Chemistry
Health and safety checked, 2016


1 Reader's comment