


Clarify the ideas of burning, melting and evaporating with your students and tackle some misconceptions about candles with these activities for 11–14 year olds
Beginning with a practical demonstration and activity, students explore what happens when a candle burns. This context is used as a means to focus their thinking and discussion about burning.
The activities in this lesson plan are designed to deal explicitly with any confusion that may exist between the ideas of burning, melting and evaporating and, in particular, to check on the following misconceptions:
- When a candle burns the burning wick melts the wax which runs away.
- When a candle burns the burning wick evaporates the wax into the air.
Learning objectives
Students will be able to:
- Describe and explain what happens when a candle burns.
Sequence of activities
Introduction and demonstration
- Light a large candle and ask students how it will be different if it is left to burn for an hour to establish the idea that the candle will get shorter as it burns.
- Share the learning objective for the session.
Investigation: stage 1
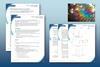
- Give each student a copy of ‘Sheet 1: What happens when a candle burns?’.
- Circulate and support with prompts while students:
- Work in pairs.
- Collect a candle, light it and observe what happens over three or four minutes.
- Ask the students to:
- Each draw, on ‘Sheet 1’, a labelled diagram to represent what happens when a candle burns.
- Swap diagrams with their partner.
- Write in the boxes on the sheet what they think is good about the other student’s diagram and what they think might have improved it.
- Hand the sheets back again and discuss the comments on each.
Investigation: stage 2
- Give each student a copy of ‘Sheet 2: Why does a candle get shorter when it burns?’.
- Circulate and support with prompts while students:
- Look at the suggested explanations for why a burning candle gets shorter.
- In their pairs decide on which explanation they feel is most likely.
- Rule out any explanation which they feel sure is not right.
- Write down the agreed views on their copy of the sheet.
Investigation: stage 3
- Ask students to relight the candle and to insert the lower end of an upward sloping glass tube into the flame (see Practical notes). You may find it helpful to demonstrate how to do this.
- Assist students to place a burning splint at the upper end of the tube to light what is coming out of the tube.
- Draw attention to a pair that has succeeded in doing this.
- Ensure the candles are blown out.
Investigation: stage 4
Circulate and support with prompts while students:
- Work in pairs.
- Discuss the impact of what they have seen on their original views about why a candle gets shorter when it burns.
- Fill in the remaining spaces on ‘Sheet 2’.
Plenary
- In a plenary, select students to share their original ideas about why the candle gets shorter when it burns. Prompt them to say:
- If they changed their ideas as a result of the experiment using the glass tube.
- Why their ideas changed.
- Invite other students to comment on what has been said and to add their own ideas.
- Steer the group to the idea of wax vapour burning and the role of the wick. Possible questions:
- What do you think is burning at the end of the glass tube?
- How did it get there?
- How useful would a candle be that didn’t have a wick?
- Ask students to add their notes on ‘Sheet 2’ if necessary.
Feedback
Take in the students’ sheets and add comments appropriate to their diagrams and comments.
Practical notes

Equipment
- Candle
- Splint to light candle
- Retort stand and clamp
- Piece of glass tubing, about 10 cm long – have glass tubing already clamped at a convenient height and slope
Health, safety and technical notes
- Read our standard health and safety guidance.
- It is the responsibility of the teacher to carry out an appropriate risk assessment.
- The employer’s risk assessments on the use of fuels should be followed.
- Eye protection should be worn.
- Long hair should be tied back.
Principal hazard
- Naked flame
Commentary
The initial demonstration makes the learning objective meaningful. Exchanging drawings encourages students to criticise fairly. Working in pairs, to choose one of the three explanations of why candles get shorter when they burn, gives each student a chance to develop and articulate their ideas. In the plenary, as the students review their initial ideas, the misconceptions become clear. Written feedback guides the students to their next steps.
Answers
Sheet 1: What happens when a candle burns?
In the box titled, ’My labelled drawing to show what happens when a candle burns’, the diagram should show some of the following points:
- The flame has a yellow tip.
- Flame is blue at edges near the candle.
- There is a dark area in the flame above the wick.
- The flame flickers and changes shape.
- Most of the wick is blackened.
- The tip of the wick glows.
- Wax melts at the base of the wick.
Sheet 2: Why does a candle get shorter when it burns?
- ’Lucy: The burning wick melts the solid wax which runs away down the side of the candle.’ This is definitely wrong.
- ’Dan: The burning wick evaporates the wax into the air.’ This is definitely wrong.
- ’Dawn: The wax vapour burns and forms gases which we can’t see and they mix with the air.’ This is definitely correct.
Downloads
Sheet 1: What happens when a candle burns?
Editable handout | Word, Size 1 mbSheet 1: What happens when a candle burns?
Handout | PDF, Size 27.35 kbSheet 2: Why does a candle get shorter when it burns?
Editable handout | Word, Size 1.01 mbSheet 2: Why does a candle get shorter when it burns?
Handout | PDF, Size 31.56 kb
Additional information
This lesson plan was originally part of the Assessment for Learning website, published in 2008.
Assessment for Learning is an effective way of actively involving students in their learning. Each session plan comes with suggestions about how to organise activities and worksheets that may be used with students.
Acknowledgements
V. Barker, Beyond Appearances: Student’s misconceptions about basic chemical ideas: A report prepared for The Royal Society of Chemistry, London, section 6.2.4 Burning a candle. London: Royal Society of Chemistry, 2000.

No comments yet