


Try this class practical to carry out chromatography using dye from different coloured sweets
This resource has been updated to accompany the article Spoiling our Funfetti in Education in Chemistry, which explains why sprinkles are not always bake-safe and why American candies are often more vividly coloured than sweets in the UK.
Learning objectives
- Recap the keywords for chromatography.
- Investigate the dyes that are in different coloured sweets by successfully following a method.
- Analyse the results and write a conclusion.
The starter questions activate learners’ prior knowledge of chromatography and correct answers show success in meeting LO1.
A completed chromatogram showing separation of the dyes will assess LO2. Learners can take a photo of their chromatogram or stick it directly into their exercise books to evidence this LO.
The conclusion questions assess LO3.
Introduction
This experiment goes down well with learners since it uses well-known material normally used as confectionery. Learners begin by removing the dye from the surface of sweets of various colours, such as M&M’s®. They then put a spot of each onto a piece of chromatography paper, before allowing water to soak up the paper, separating out the component dyes.
The results of the chromatography show which dye mixtures are used to produce each colour for the sweets.
Learners should have a good basic understanding of chromatography theory and this practical can be a useful introduction to the method of separation. They can carry out the experiment in groups of two or three and it takes 30–40 minutes. Tell your learners that they should not eat the sweets under any circumstances.
Scaffolding
The resource is available in its original format and as a support sheet. The support version has a match-up activity for the starter questions and an alternative method with step-by-step images to reduce cognitive load.
Note: the support version provides a different way to dip the paper in the water and does not match the method in the original version, but it is less fiddly.
For additional challenge, you can ask learners to calculate the Rf value using a given equation (slide 10). You could also discuss that the relative distance travelled by each ‘spot’ depends not only on its solubility in water but also on its attraction to the cellulose components of the paper.
Equipment
Per group:
- Beaker, 250 cm3
- Small soft paint brush
- Two paper clips (preferably plastic-coated)
- Chromatography paper, approximately 20 cm x 10 cm (see note 3 below)
- Pencil
- Ruler
- A communal hairdryer (optional)
- A supply of M&M’s® of various colours
- Access to tap water in a beaker to use with the paint brush
Health, safety and technical notes
- Read our standard health and safety guidance
- Learners should wear safety glasses.
- Do not use Peanut M&M’s® due to the risk of allergic reaction from peanuts.
- Learners must not attempt to eat or lick the M&M’s® which are for laboratory use only.
- Check packaging for any possible allergy or hazard if you are using a different type of sweets or food colouring.
Preparation
- You can supply the sweets on a spotting tile for stability. As an alternative to using a paint brush, learners can add three drops of water to each sweet on the spotting tile and transfer the coloured liquid to the chromatography paper using melting point tubes.
- Whatman® chromatography paper works best for this experiment but, if unavailable, large sheets of ordinary filter paper can be cut up instead.
- If M&M’s® are unavailable, this experiment can be carried out with liquid food colourings or powdered food colourings dissolved in water (available from scientific suppliers only). Do not use gel food colouring. Chromatography of Smarties® is less successful as they use natural food colourings.
- M&M’S® with a variety of about six or seven different colours are required for each group.
Disposal
- Dispose of used chromatography paper and waste sweets with general waste.
- Wash and reuse melting point tubes (if used).
- Dispose of waste liquid food colouring suitable for food consumption (if used as an alternative) down the drain with plenty of water.
More resources
- Brighten up your chromatography lessons with these five teacher-tested ideas.
- Enhance practical chromatography in your classroom with ideas, suggested contexts and resources.
- Find out how chromatography has been used to fight food fraud with this article and related classroom activity which frames questions about chromatography’s underlying concepts in another real-world context.
- Learn about colours in food while listening to a short podcast produced by FunKids Radion and the RSC.
- Find out how an associate principal scientist builds computer models that predict the reactions and interactions between different chemicals to influence the taste and texture of chocolate and biscuits.
Procedure
- Place the piece of chromatography paper on a clean flat surface, with the longer side horizontal
- Draw a horizontal line in pencil (not biro) about 1.5 cm from the base of the paper.
- Use a dampened paint brush to remove the colour from one of the M&M’s® and paint this colour on the line about 2 cm from one end. Small spots are best.
- Clean the brush in fresh running water.
- Paint the colour of another M&M® on the line about 2 cm from the first spot.
- Repeat this until all the colours are on the paper or until you have reached the other end.
- Use a pencil (not a biro) to write the name of the colour next to the corresponding spot.
- Roll the paper into a cylinder and hold this in place with the paper clips. Try to avoid any overlapping of the paper when you make the cylinder.
- Put water into the beaker up to depth of about 1 cm.
- Lower the paper cylinder into the beaker of water allowing the water to rise up the paper. Ensure that the water is below the level of the spots. Try to avoid moving the paper cylinder about once it is in position.
- When the water approaches the top of the paper cylinder remove it from the water. Use a pencil to mark the level of the water at the top of the filter paper.
- Allow the paper cylinder to dry, using a hairdryer if available or by clamping it and leaving it to dry overnight.
- Unravel the paper cylinder and examine it carefully.
Teaching notes
Encourage the students to make small intense spots on the paper and to avoid smudging.
Some dyes will be found to produce only one spot further up the paper, whilst others will have spread into two or more areas of colour.
If appropriate students should be told that the relative distance travelled by each ‘spot’ depends not only on its solubility in water but also on its attraction for the cellulose components of the paper.
It should be emphasised that each ‘spot’ may well still be a mixture of dyes, and that a more effective separation might occur:
- If the distance travelled by the spots is increased, eg by using a taller cylinder in a taller beaker
- With a different solvent, other than water
- With a different stationary phase (eg silica plates).
Questions for students
Starter questions
- What is meant by the word ’solute’?
- What does ‘solvent’ mean?
- Define the term ’solution’.
- What is meant by the word ‘mixture’?
- Define the term ‘chromatography’.
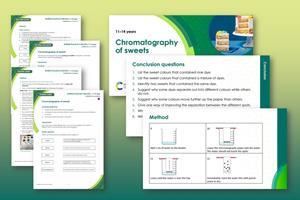
Conclusion questions
- List the sweet colours that contained one dye.
- List the sweet colours that contained a mixture of dyes.
- Identify two sweets that contained the same dye.
- Suggest why some dyes separate out into different colours while others do not.
- Suggest why some colours move further up the paper than others.
- Give one way of improving the separation between the different spots.
- What common errors can be made during the procedure?
- Why is the start line drawn in pencil rather than pen?
Downloads
Chromatography of sweets - student sheet
Editable handout | Word, Size 0.59 mbChromatography of sweets - student sheet
Handout | PDF, Size 0.21 mbChromatography of sweets - student support sheet
Editable handout | Word, Size 0.6 mbChromatography of sweets - student support sheet
Handout | PDF, Size 0.26 mbChromatography of sweets - teacher guidance
Editable handout | Word, Size 0.43 mbChromatography of sweets - teacher guidance
Handout | PDF, Size 0.16 mbChromatography of sweets - technician portrait
Editable handout | Word, Size 0.52 mbChromatography of sweets - technician portrait
Handout | PDF, Size 0.16 mbChromatography of sweets
Editable handout | PowerPoint, Size 1.28 mbChromatography of sweets
Presentation | PDF, Size 0.71 mbChromatography of sweets SUPPORT
Presentation | PowerPoint, Size 0.84 mbChromatography of sweets SUPPORT
Presentation | PDF, Size 0.64 mb
Additional information
This is a resource from the Practical Chemistry project, developed by the Nuffield Foundation and the Royal Society of Chemistry. This collection of over 200 practical activities demonstrates a wide range of chemical concepts and processes. Each activity contains comprehensive information for teachers and technicians, including full technical notes and step-by-step procedures. Practical Chemistry activities accompany Practical Physics and Practical Biology.
© Nuffield Foundation and the Royal Society of Chemistry
Health and safety checked, 2016 The resource was updated in 2023 with additional starter questions, support worksheet and powerpoint by Holly Walsh and additional technician notes by Sandrine Bouchelkia.


1 Reader's comment