


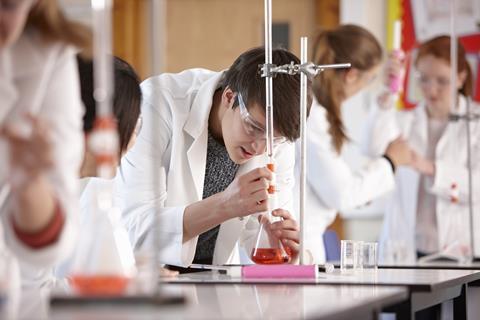
In this experiment students neutralise sodium hydroxide with hydrochloric acid to produce the soluble salt sodium chloride in solution. They then concentrate the solution and allow it to crystallise to produce sodium chloride crystals
You have to decide if this experiment is suitable to use with different classes, and look at the need for preliminary training in using techniques involved in titration (see Teaching notes). What follows here assumes that teachers have judged the class to be capable of doing this experiment using a burette with reasonable expectation of success.
Assuming that the students have been given training, the practical work should, if possible, start with the apparatus ready at each work place in the laboratory. This is to avoid vulnerable and expensive glassware (the burette) being collected from an overcrowded central location.
Time required
Stage 1
Filling the burette, measuring out the alkali into the flask, and titrating it until it is neutralised takes about 20 minutes, with false starts being likely for many groups. In practice it does not matter if the end-point is overshot, even by several cubic centimetres, but the aim is to find the proportions for a roughly neutral solution.
Stage 2
Producing a neutral solution free of indicator, should take no more than 10 minutes.
Stage 3
Evaporating the solution may take the rest of the lesson to the point at which the solution can be left to crystallise for the next lesson. Watching solutions evaporate can be tedious for students, and they may need another task to keep them occupied – eg rinsing and draining the burettes with purified water.
Equipment
Apparatus
- Eye protection
- Burette, 30 or 50 cm3 (note 1)
- Conical flask, 100 cm3
- Beaker, 100 cm3
- Pipette, 20 or 25 cm3, with pipette filter
- Stirring rod
- Small (filter) funnel, about 4 cm diameter
- Burette stand and clamp (note 2)
- White tile (optional; note 3)
- Bunsen burner
- Tripod
- Pipeclay triangle (note 4)
- Evaporating basin, at least 50 cm3 capacity
- Crystallising dish (note 5)
- Microscope or hand lens suitable for examining crystals in the crystallising dish
Apparatus notes
- If your school still uses burettes with glass stopcocks, consult the CLEAPSS Laboratory Handbook, section 10.10.1, for their care and maintenance. This experiment will not be successful if the burettes used have stiff, blocked or leaky stopcocks. Modern burettes with PTFE stopcocks are much easier to use, require no greasing, and do not get blocked. Burettes with pinchcocks of any type are not recommended; while cheap, they also are prone to leakage, especially in the hands of student beginners.
- Burette stands and clamps are designed to prevent crushing of the burette by over-tightening, which may happen if standard jaw clamps are used.
- The optional white tile is to go under the titration flask, but white paper can be used instead.
- Ceramic gauzes can be used instead of pipeclay triangles, but the evaporation then takes longer.
- The evaporation and crystallisation stages may be incomplete in the lesson time. The crystallisation dishes need to be set aside for crystallisation to take place slowly. However, the dishes should not be allowed to dry out completely, as this spoils the quality of the crystals. With occasional checks, it should be possible to decide when to decant surplus solution from each dish to leave good crystals for the students to inspect in the following.
Chemicals
- Sodium hydroxide solution, 0.4 M (IRRITANT), about 100 cm3 in a labelled and stoppered bottle
- Dilute hydrochloric acid, 0.4 M, about 100 cm3 in a labelled and stoppered bottle
- Methyl orange indicator solution (or alternative) in small dropper bottle
Health, safety and technical notes
- Read our standard health and safety guidance.
- Wear eye protection throughout.
- Sodium hydroxide solution, NaOH(aq), (IRRITANT at concentration used) – see CLEAPSS Hazcard HC091a and CLEAPSS Recipe Book RB085. The concentration of the solution does not need to be made up to a high degree of accuracy, but should be reasonably close to the same concentration as the dilute hydrochloric acid, and less than 0.5 M.
- Dilute hydrochloric acid, HCl(aq) – see CLEAPSS Hazcard HC047a and CLEAPSS Recipe Book RB043. The concentration of the solution does not need to be made up to a high degree of accuracy, but should be reasonably close to the same concentration as the sodium hydroxide solution, and less than 0.5 M.
- Methyl orange indicator solution (the solid is TOXIC but not the solution) – see CLEAPSS Hazcard HC032 and CLEAPSS Recipe Book RB000.
Procedure
Stage 1
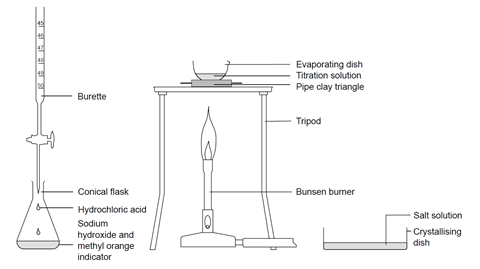
- Using a small funnel, pour a few cubic centimetres of 0.4 M hydrochloric acid into the burette, with the tap open and a beaker under the open tap. Once the tip of the burette is full of solution, close the tap and add more solution up to the zero mark. (Do not reuse the acid in the beaker – this should be rinsed down the sink.)
- Use a pipette with pipette filler to transfer 25 (or 20) cm3 of 0.4 M sodium hydroxide solution to the conical flask, and add two drops of methyl orange indicator. Swirl gently to mix. Place the flask on a white tile or piece of clean white paper under the burette tap.
- Add the hydrochloric acid to the sodium hydroxide solution in small volumes, swirling gently after each addition. Continue until the solution just turns from yellow-orange to red and record the reading on the burette at this point. This coloured solution should now be rinsed down the sink.
Stage 2
- Refill the burette to the zero mark. Carefully add the same volume of fresh hydrochloric acid as you used in stage 1, step 3, to another 25 (or 20) cm3 of sodium hydroxide solution, to produce a neutral solution, but this time without any indicator.
Stage 3
- Pour this solution into an evaporating basin. Reduce the volume of the solution to about half by heating on a pipeclay triangle or ceramic gauze over a low to medium Bunsen burner flame. The solution spits near the end and you get fewer crystals. Do not boil dry. You may need to evaporate the solution in, say, 20 cm3 portions to avoid overfilling the evaporating basin. Do not attempt to lift the hot basin off the tripod – allow to cool first, and then pour into a crystallising dish.
- Leave the concentrated solution to evaporate further in the crystallising dish. This should produce a white crystalline solid in one or two days.
- Examine the crystals under a microscope.
Looking for an alternative method?
Check out our practical video on preparing a salt for a safer method for evaporating the solution, along with technician notes, instructions and a risk assessment activity for learners.
Teaching notes
Titration using a burette, to measure volumes of solution accurately, requires careful and organised methods of working, manipulative skills allied to mental concentration, and attention to detail. All of these are of course desirable traits to be developed in students, but there has to be some degree of basic competence and reliability before using a burette with a class. The experiment is most likely to be suited to 14–16 year old students. This is discussed further below, but what follows here assumes that you have judged the class to be capable of doing this experiment using a burette with reasonable expectation of success.
Students need training in using burettes correctly, including how to clamp them securely and fill them safely. You should consider demonstrating burette technique, and give students the opportunity to practise this. In this experiment a pipette is not necessary, as the aim is to neutralise whatever volume of alkali is used, and that can be measured roughly using a measuring cylinder.
It is not the intention here to do quantitative measurements leading to calculations. The aim is to introduce students to the titration technique only to produce a neutral solution.
Alternative indicators you can use include screened methyl orange (green in alkali, violet in acid) and phenolphthalein (pink in alkali, colourless in acid).
Leaving the concentrated solutions to crystallise slowly should help to produce larger crystals. The solubility of sodium chloride does not change much with temperature, so simply cooling the solution is unlikely to form crystals.
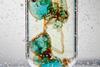
Under the microscope (if possible, a stereomicroscope is best) you can see the cubic nature of the crystals. If crystallisation has occurred in shallow solution, with the crystals only partly submerged, ‘hopper-shaped’ crystals may be seen. In these crystals, each cube face becomes a hollow, stepped pyramid shape.
Student questions
Stage 1
What substances have been formed in this reaction? Write a word equation and a symbol equation.
Stage 2
Why must you use another 25 cm3 of sodium hydroxide solution, rather than making your crystals from the solution in stage 1?
Stage 3
What shape are the crystals?
Additional information
This is a resource from the Practical Chemistry project, developed by the Nuffield Foundation and the Royal Society of Chemistry.
Practical Chemistry activities accompany Practical Physics and Practical Biology.
The experiment is also part of the Royal Society of Chemistry’s Continuing Professional Development course: Chemistry for non-specialists.
© Nuffield Foundation and the Royal Society of Chemistry


6 readers' comments