


The volume of hydrogen gas produced is measured over a few minutes, and the results are used to plot a graph
This is intended as a class practical. It is best if the students work in pairs because setting up and starting the experiment requires more than one pair of hands. One student can add the magnesium ribbon to the acid and stopper the flask, while the other starts the stopclock. During the experiment, one student can take the readings while the other records them. The experiment itself takes only a few minutes. But allow at least 30 minutes to give students time to set up, take readings and draw graph.
Hydrogen gas (extremely flammable) is generated in the experiment. Students should not have access to any source of ignition.
Equipment
Apparatus
- Eye protection
- Conical flask (100 cm3)
- Single-holed rubber bung and delivery tube to fit conical flask (note 1)
- Trough or plastic washing-up bowl (note 2)
- Measuring cylinders (100 cm3), x2
- Clamp stand, boss and clamp
- Stopwatch
- Graph paper
Apparatus notes
- The bungs in the flasks need to be rubber. Corks are too porous and will leak. The tube through the bung should be a short section of glass, and then a flexible rubber tube can be connected.
- Gas syringes can be used instead of troughs of water and measuring cylinders. But these are very expensive and are probably best used by the teacher in a demonstration. Syringes should not be allowed to become wet, or the plungers will stick inside the barrels.
Chemicals
- Magnesium ribbon cut into 3 cm lengths
- Dilute hydrochloric acid, 1M
Health, safety and technical notes
- Read our standard health and safety guidance
- Wear eye protection throughout. Ensure that there are no naked flames.
- Magnesium ribbon, Mg(s) – see CLEAPSS Hazcard HC059a. The magnesium ribbon should be clean and free from obvious corrosion or oxidation. Clean if necessary by rubbing lengths of the ribbon with fine sandpaper to remove the layer of oxidation.
- Hydrochloric acid, HCl(aq) – see CLEAPSS Hazcard HC047a and CLEAPSS Recipe Book RB043. The hydrochloric acid should be about 1M for a reasonable rate of reaction. Each experiment run will need 50 cm3. Though low hazard, eye protection is necessary as you may get a spray as tiny bubbles burst.
- Hydrogen gas, H2(g) (EXTREMELY FLAMMABLE) – see CLEAPSS Hazcard HC048. Ensure that all naked flames are extinguished, and that there are no other sources of ignition available to students.
Procedure
- Measure 50 cm3 of 1M hydrochloric acid using one of the measuring cylinders. Pour the acid into the 100 cm3 conical flask.
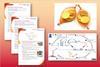
- Set up the apparatus as shown in the diagram. Half fill the trough or bowl with water.
- Fill the other measuring cylinder with water, and make sure that it stays filled with water when you turn it upside down.
- When you are ready, add a 3 cm strip of magnesium ribbon to the flask, put the bung back into the flask as quickly as you can, and start the stopwatch.
- Record the volume of hydrogen gas given off at suitable intervals (eg 10 seconds). Continue timing until no more gas appears to be given off.

Teaching notes
The equation for the reaction is: magnesium + hydrochloric acid → magnesium chloride + hydrogen
Mg(s) + 2HCl(aq) → MgCl2(aq) + H2(g)
Students follow the rate of reaction between magnesium and the acid, by measuring the amount of gas produced at 10 second intervals.
3 cm of magnesium ribbon typically has a mass of 0.04 g and yields 40 cm3 of hydrogen when reacted with excess acid. 50 cm3 of 1M hydrochloric acid is a six-fold excess of acid.
In this reaction, the magnesium and acid are gradually used up. However the acid is in excess, so it is mainly the loss of magnesium (surface area becomes smaller) that causes the change in the rate.
If a graph of volume (y-axis) against time (x-axis) is drawn, the slope of the graph is steepest at the beginning. This shows that the reaction is fastest at the start. As the magnesium is used up, the rate falls. This can be seen on the graph, as the slope becomes less steep and then levels out when the reaction has stopped (when no more gas is produced).
The reaction is exothermic, but the dilute acid is in excess and the rise in temperature is only of the order of 3.5˚C. There is some acceleration of the reaction rate due to the rise in temperature. Some students might notice the flask becoming slightly warm and they could be asked how this would affect the rate of reaction, and how they might adapt the experiment to make it a ‘fair test’.
Additional information
This is a resource from the Practical Chemistry project, developed by the Nuffield Foundation and the Royal Society of Chemistry.
Practical Chemistry activities accompany Practical Physics and Practical Biology.
Health & Safety checked, 2016


9 readers' comments