


Illustrate the presence of water and carbon dioxide in the products of hydrocarbon combustion in this demonstration
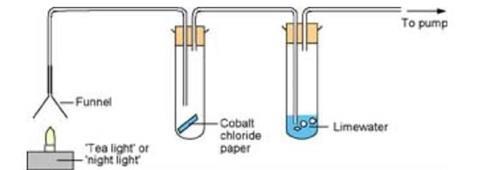
In this experiment, students observe as the teacher burns a solid hydrocarbon (in the form of a tea light or candle), using a pump to divert the gaseous combustion products. These substances are then drawn by the pump over a piece of cobalt chloride paper and through limewater, with changes indicating the presence of water and carbon dioxide respectively.
With this demonstration, the apparatus can be left running for some time and students can file past in small groups to see it more closely. Alternatively a flexicamera can be used, linked to a projector.
If students are not familiar with the cobalt chloride paper and limewater tests, either demonstrate these separately or allow students to try the tests themselves.
Assuming everything is already set up this demonstration takes only a few minutes.
Looking for a class practical?
Check out a simplified version of the experiment below, using a gas jar to collect the products of combustion, which is suitable for students to carry out themselves.
Equipment
Apparatus
- Eye protection
- Glass funnel, about 6 cm in diameter
- Boiling tubes, x2
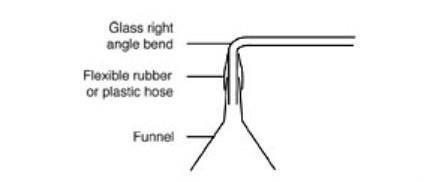
- Two-holed rubber bungs, x2, to fit the boiling tubes, and fitted with one long and one short piece of glass tubing (see diagram)
- Glass or plastic tubing for connections (see note 5 below)
- Filtering pump (see note 6)
Chemicals
- Tea light, night light or candle
- Piece of blue cobalt chloride paper (TOXIC)
- Limewater (treat as IRRITANT), about 20 cm3
Health, safety and technical notes
- Read our standard health and safety guidance.
- Wear eye protection throughout.
- Cobalt chloride/cobalt chloride paper (TOXIC, DANGEROUS TO THE ENVIRONMENT) – see CLEAPSS Hazcard HC025 and CLEAPSS Recipe Book RB030. Cobalt chloride paper can be stored in a desiccator. Minimise handling of cobalt chloride paper (SENSITISER) and wash hands after use (cobalt chloride is a category 2 carcinogen). See the standard procedure for preparing and using cobalt chloride papers for more information.
- Calcium hydroxide solution, ‘limewater’, Ca(OH)2 (aq), (treat as IRRITANT) – see CLEAPSS Hazcard HC018 and CLEAPSS Recipe Book RB020. Ideally, the limewater should be made fresh on the day.
- Care should be taken with the right-angle bend connected to the funnel. If this is made of flexible tubing, it can get hot and melt. Ideally, the glass stem of the funnel should be bent into a right-angle. Alternatively, join a standard funnel onto a right angled piece of glass tubing using epoxy resin. A more temporary arrangement is to slide one arm of a right-angled piece of glass tubing inside the stem of the funnel and seal the join on the outside with a piece of flexible tubing (see diagram).
- Information about the type and use of various grades of filter papers can be found in section 9.11.4 of the CLEAPSS Laboratory Handbook. The use of traditional water-operated filter pumps for vacuum filtration and for drawing air through solutions is covered in section 10.6.4 of the CLEAPSS Laboratory Handbook. It is strongly recommended that this is referred to before purchasing or using such pumps – it may not be possible or appropriate to use this type of equipment in your school or college. Alternative means of carrying out vacuum filtration and drawing air through solutions are suggested in this section of the Laboratory Handbook.
Procedure
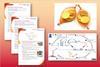
- Before the demonstration, assemble the apparatus as shown in first diagram above. Ensure that the connections to the boiling tubes are the correct way round.
- Place a piece of blue cobalt chloride paper into the first boiling tube and half-fill the second boiling tube with limewater.
- At the start of the demonstration, turn on the pump so that a gentle stream of air is drawn through the apparatus.
- Light the tea light and leave for a few minutes until the cobalt chloride paper turns pink (from blue) and the limewater goes milky (produces a white precipitate). This indicates the presence of water and carbon dioxide respectively.
Teaching notes
Some students will know that air contains both water vapour and carbon dioxide. To show that the changes observed are not due to these alone, repeat the experiment without the tea light and note how much longer it takes for any changes to be observed.
Understanding the process of burning is important at all levels of chemistry. Emphasis that burning in air is a reaction with oxygen. The elements hydrogen and carbon are present in hydrocarbons, such as candle wax. Students will quite readily appreciate that carbon reacts with oxygen to form carbon dioxide, but often need help to grasp that hydrogen combines with oxygen to form water.
The production of carbon dioxide could lead to discussion of the role of this gas in the greenhouse effect.
The experiment could be extended to burning alcohols with a spirit burner.
Try this simplified class practical
In this alternative version of the experiment above, students burn a candle inside a gas jar, before testing for the presence of carbon dioxide and water.
Student sheet
Download the accompanying student sheet as a PDF or editable Word document.
Apparatus
- Gas jar and lid
- Candle on a tray
- Heat resistant mat
Chemicals
- Limewater (treat as IRRITANT), 0.02 mol dm–3
- Piece of blue cobalt chloride paper (TOXIC)
Health, safety and technical notes
See notes 1–4 in the health and safety guidance above.
Procedure
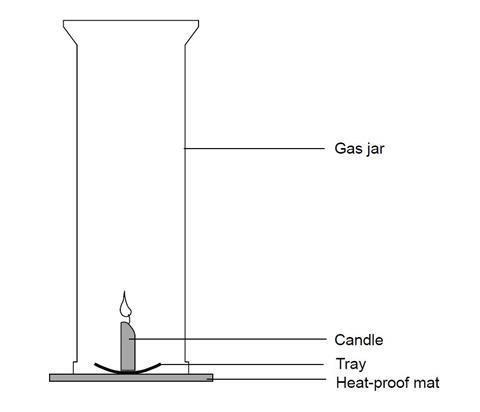
- Set up the apparatus as shown in the diagram. The gas jar should be placed over the lit candle on a heatproof mat.
- When the candle goes out, put a lid on the gas jar.
- Test to see if the candle made water by adding a piece of blue cobalt chloride paper, test the sides of the jar. If it turns pink, water is present. Record what you observe.
- Now test to see if carbon dioxide was produced. Pour a little limewater into the gas jar. Swill it around a little. If carbon dioxide is present, the limewater turns cloudy. Record what you observe.
Questions for students
- What is the gas that reacts with the hydrocarbon when it burns?
- What gases does the candle produce when it burns?
- Name another fuel that produces the same gases when it burns.
Answers
- Oxygen.
- Carbon dioxide and water.
- Methane or similar hydrocarbon or fuel.
Teaching tips
As an extension, the students could suggest other experiments to do to find out if other fuels form carbon dioxide and water when they burn.
Data logging sensors and software can be used to demonstrate what may be happening in the jar as the candle burns. Use a bell jar and place sensors inside to monitor humidity, temperature, light or oxygen levels as the candle burns. The software will show the changes as a graph against time. When the candle extinguishes, readmit air to the jar and continue to record for a few moments.
Downloads
Identifying the products of combustion - student sheet
Editable handout | Word, Size 75.92 kbIdentifying the products of combustion - student sheet
Handout | PDF, Size 0.18 mb
Additional information
This is a resource from the Practical Chemistry project, developed by the Nuffield Foundation and the Royal Society of Chemistry.
Practical Chemistry activities accompany Practical Physics and Practical Biology.
The experiment is also part of the Royal Society of Chemistry’s Continuing Professional Development course: Chemistry for non-specialists.
The simplified version of this resource also previously appeared as part of our Classic chemistry experiments collection.
© Nuffield Foundation and the Royal Society of Chemistry


No comments yet